Add primary key to existing table in Oracle

Posted by Ronald on January 25, 2017  /   Posted in Oracle

In addition to a previous article on How to add a primary key to an existing table in MySQL, I tried the same in Oracle as since version 12c this feature is also supported.

SELECT * FROM x1;

COL1
----------
34
43
11
65
89

We have a table with COL1 filled with some values. Now if we add the primary key with

ALTER TABLE x1 
  ADD (col2 NUMERIC(2)) generated BY DEFAULT ON NULL AS IDENTITY;

Table altered.

we see the following values in table x1

SELECT * FROM x1;

COL1       COL2
---------- ----------
34         1
43         2
11         3
65         4
89         5

COL2 is automatically filled with a unique sequence id number.

Note: Bear in mind that adding this kind of primary key to a huge table can take a considerable amount of time.

Now cleaning up gave a rather surprising feedback:

drop table x1;

*
ERROR at line 1:
ORA-00600: internal error code, arguments: [12811], [91872],  [],...

We ran into unpublished bug 18744247 – ORA-30667 ON DROPPING COLUMN WITH ‘DEFAULT ON NULL’ ATTRIBUTE. The problem has something to do with the fact that the auto increment column is not available in the dictionary tables.

When trying to reproduce on one of our Oracle database on docker with same version 12.1.0.2, but with a different PSU level, the problem didn’t occur.

So if you will run into this problem really depends on your database version. The problem should be solved in Oracle 12.2 but interim patches are available for databases with recent PSU updates installed.


Add primary key to existing table in MySQL

Posted by Ronald on January 25, 2017  /   Posted in MySQL

One of my colleague sysadmins wanted to set up replication for his WordPress hosting databases. Some of his customers were using rather old WP plug-ins using tables that actually didn’t have a Primary Key (PK) defined on it. And since having (a sort of) PK is one of the first requirements for setting up replication he asked me how to solve this in an easy way.

The table has only 1 column with values:

mysql> select * from x1;
 +------+
 | col1 |
 +------+
 | 1    |
 | 2    |
 | 3    |
 | 4    |
 | 1    |
 | 2    |
 | 3    |
 | 4    |
 +------+
 8 rows in set (0.00 sec)

In MySQL adding a PK can be done with the AUTO INCREMENT option so we don’t have to worry about any sequence or serial number

ALTER TABLE x1
  ADD col2 INT PRIMARY KEY auto_increment; 

Query OK, 8 rows affected (0.16 sec)
Records: 8 Duplicates: 0 Warnings: 0

As we see from the feedback, 8 rows are affected. That means in this case that every record has it’s col2 value defaulted to a next unique sequence number:

mysql> select * from x1;
+------+------+
| col1 | col2 |
+------+------+
|   1  |   1  |
|   2  |   2  |
|   3  |   3  |
|   4  |   4  |
|   1  |   5  |
|   2  |   6  |
|   3  |   7  |
|   4  |   8  |
+------+------+
8 rows in set (0.00 sec)

Col2 has now unique values for each row and a new PK is defined on the table:

mysql> desc x1;
 +-------+---------+------+-----+---------+----------------+
 | Field | Type    | Null | Key | Default | Extra          |
 +-------+---------+------+-----+---------+----------------+
 | col1; | int(11) | YES  |     | NULL    |                |
 | col2; | int(11) | NO   | PRI | NULL    | auto_increment |
 +-------+---------+------+-----+---------+----------------+
 

Bear in mind that executing this action on a huge table can take a long time so first run this action on a test environment to determine the execution time.

Adding a PK with auto increment in Oracle is described in Add primary key to existing table in Oracle.

How to exclude table data from Oracle Data Pump export

Posted by Ronald on May 15, 2014  /   Posted in Oracle, Oracle Backup & Recovery, Oracle Datapump

In a previous article I wrote about the REMAP_DATA option to skip column data when doing a datapump export. But what if you want from some of your tables only the table structure and all of its related objects but not the data? Well that’s easy to accomplish using Oracle datapumps QUERY option.

With this option, preferably specified in a parameter file, queries can be added when doing a datapump export like this:
QUERY=<schema>.<table_name>:"<condition>"
For example:
QUERY=ins_owner.aud_doc_document:"WHERE rownum < 1"
Using the “WHERE rownum < 1” clause no data will be exported for this table. In this way you can skip the data in tables that you don’t need but you will keep all table structure and related objects. For example when making a production copy you may not need audit and log data or confidential data and can easily skip this data using this method.

How to exclude column data from Oracle Data Pump export

Posted by Ronald on May 15, 2014  /   Posted in Oracle, Oracle Backup & Recovery, Oracle Datapump

One of the database systems we develop consists of a 3 database set-up, connected to each other by database links and Java services. This is not an ideal configuration but was historically grown because of different ownership of the data at that time. And yes, one day all 3 databases will be merged into 1 database, one day…

Twice a year we ask our customer for a masked copy of production data. Before masking the data you need of course a copy of the database to work in and this can be done easily by using RMAN or using the data pump expdp tool. Our customers choice was expdp…

The extra challenge with making a copy of the production environment is that all three database ‘restores’ must be of the same time stamp. Now Oracle provides SCN functionality for restore points using expdp, that’s working great. However, 2 of the 3 databases contain reasonable amounts of documents and getting a set of 3 database export dumps with got more difficult as the databases grew bigger and bigger. ORA-01555 – Snapshot-too-old messages appeared and the customer had more and more difficulty getting an consistent dataset between all databases because of the duration and size of the databases.

So, the customer asked us for a optimization solution for the current export process using Oracle data pump.

Since we we’re already using Virtual Private Database (VPD) functionality in one of these databases I was wondering if using VPD functionality together with expdp was possible, since we have already seen that there are errors during export like ORA-39181: Only partial table data may be exported due to fine grain access control.

Our conclusion was that VPD is not usable when running expdp as user SYS or SYSTEM. For some reason the VPD policies don’t get activated and since doing schema backups was not an option for us we had to look further.

Fortunately Oracle datapump delivers functionality to accomplish the same result, ignore columns in the export, even in a much easier way than VPD.

The datapump REMAP_DATA option give you ability to do a function call before writing data to the export file. If we make sure the functions returning value is empty, nothing will be written in the end.

Because we don’t want to interfere with production schema’s we create a temporary user and give it the correct privileges:
create user ANO_BEHEER identified by ano_beheer
default tablespace users;

grant DATAPUMP_EXP_FULL_DATABASE to ANO_BEHEER;
grant RESOURCE to ANO_BEHEER ;
grant READ on directory EXPORT_BACKUP_DIR to ANO_BEHEER;
grant WRITE on directory EXPORT_BACKUP_DIR to ANO_BEHEER;

Now connect as the new user and create a package containing different functions. We created functions for emptying LOBS, BLOBS and (long) VARCHAR2 columns:
CREATE OR REPLACE PACKAGE ano_remove_data AUTHID CURRENT_USER
AS
  FUNCTION ano_empty_lob(old_blob IN BLOB) RETURN BLOB;
  FUNCTION ano_empty_lob(old_clob IN CLOB) RETURN CLOB;

  FUNCTION ano_empty_field(old_varchar IN VARCHAR2) RETURN VARCHAR2;

END ano_remove_data;
/

CREATE OR REPLACE PACKAGE BODY ano_remove_data AS
 
FUNCTION ano_empty_lob(old_blob IN BLOB) RETURN BLOB
IS
BEGIN
   RETURN EMPTY_BLOB();
END;

FUNCTION ano_empty_lob(old_clob IN CLOB) RETURN CLOB
IS
BEGIN
   RETURN EMPTY_CLOB();
END;

FUNCTION ano_empty_field(old_varchar IN VARCHAR2) RETURN VARCHAR2
IS
BEGIN
   RETURN '';
END;

END ano_remove_data;
/

Now create a par file containing the function calls for the specific columns from which we don’t need the data in the format

<schema_name>.<table_name>.<column_name>:<package_name>.<function_name>

For example:
REMAP_DATA=ins_owner.doc_document.file_data:ano_remove_data.ano_empty_lob
REMAP_DATA=ins_owner.doc_document.description:ano_remove_data.ano_empty_field
REMAP_DATA=ins_owner.doc_document.document:ano_remove_data.ano_empty_blob

In this case, file_data is a CLOB column,  description has a VARCHAR2 data type and document has BLOBS stored. We’re not interested in the contents of any of these columns.

Now run the expdp command with the just created .par file and check the size of the dump file (it’s of no use to check the number of rows since we’re just skipping column data, not rows!)

As the last step, drop the user we created for this purpose.
DROP USER ANO_BEHEER CASCADE;
What are the advantages of this method?

  • Much smaller datapump export dump file, less storage necessary on OS
  • Time taken for export much smaller
  • So, according to above 2 points, import will go faster too
  • Data masking functionality already possible at the export stage!

Considering the last point, the REMAP_DATA option gives you much flexibility and even together with datapump’s QUERY option, as explained in this article, the possibilities are enormous.

Move EM 12c OMS and Repository to a new host (2/2)

Posted by Ronald on May 12, 2014  /   Posted in EM Cloud Control 12c, Oracle

Now that the OMS has been moved and configured there is one thing left: Making sure all agents are pointing the the new OMS. The targets from the central agent on the monitoring server itself need to be moved to the new management agent on the new server.

Configure the management agent

Configure the management agent, which was created during the OMS 12c Software Only install, on the new server by executing the following command:
$ ./agentDeploy.sh AGENT_BASE_DIR=/u01/app/agent12c \
AGENT_INSTANCE_HOME=/u01/app/agent12c/agent_inst \
AGENT_PORT=3872 -configOnly OMS_HOST=oramon.isd.org \
EM_UPLOAD_PORT=4903 AGENT_REGISTRATION_PASSWORD=<password>

The output of the command…

03 AGENT_REGISTRATION_PASSWORD=<agent_password>tDeploy.sh AGENT_BASE_DIR=/u01/app/agent12c AGENT_INSTANCE_HOME=/u01/app/agent12c/agent_inst AGENT_PORT=3872 -configOnly OMS_HOST=<hostname> EM_UPLOAD_PORT=49

Executing command : /u01/app/agent12c/core/12.1.0.2.0/jdk/bin/java -classpath /u01/app/agent12c/core/12.1.0.2.0/oui/jlib/OraInstaller.jar:/u01/app/agent12c/core/12.1.0.2.0/oui/jlib/xmlparserv2.jar:/u01/app/agent12c/core/12.1.0.2.0/oui/jlib/srvm.jar:/u01/app/agent12c/core/12.1.0.2.0/oui/jlib/emCfg.jar:/u01/app/agent12c/core/12.1.0.2.0/jlib/agentInstaller.jar:/u01/app/agent12c/core/12.1.0.2.0/oui/jlib/share.jar oracle.sysman.agent.installer.AgentInstaller /u01/app/agent12c/core/12.1.0.2.0 /u01/app/agent12c/core/12.1.0.2.0/sysman/install /u01/app/agent12c /u01/app/agent12c/agent_inst AGENT_BASE_DIR=/u01/app/agent12c AGENT_BASE_DIR=/u01/app/agent12c AGENT_INSTANCE_HOME=/u01/app/agent12c/agent_inst AGENT_PORT=3872 -configOnly OMS_HOST=oramon.isd.org EM_UPLOAD_PORT=4903 AGENT_REGISTRATION_PASSWORD=<agent_password>

Performing the agent configuration…

Executing command: /u01/app/agent12c/core/12.1.0.2.0/oui/bin/runConfig.sh ORACLE_HOME=/u01/app/agent12c/core/12.1.0.2.0 RESPONSE_FILE=/u01/app/agent12c/core/12.1.0.2.0/agent.rsp ACTION=configure MODE=perform COMPONENT_XML={oracle.sysman.top.agent.11_1_0_1_0.xml} RERUN=true

Configuration Log Location:/u01/app/agent12c/core/12.1.0.2.0/cfgtoollogs/cfgfw/CfmLogger<timestamp>.log


Now run the root.sh script

sudo /oracle/oem/agent12c/core/12.1.0.3.0/root.sh

Re-secure all agents

Re-secure all agents on all nodes.
emctl secure agent -emdWalletSrcUrl "https://<new server>:4903/em"
...
...
emctl start agent
...
emctl status agent

Make sure the Repository URL is pointing to the new location, the ‘Last successful upload’ has a time stamp and the final message is: ‘Agent is running and Ready‘:

Repository URL : https://<new server>:4903/empbs/upload

Last successful upload : 2014-04-07 11:12:13
—————————————————————
Agent is Running and Ready


Relocate the oracle_emrep target

Next step is to relocate the oracle_emrep target to the new OMS host. This part failed in a previous step because the old OMS was not running at the time.

So, on the old OMS, start the management agent before continuing with the next step.

emctl start agent
emctl secure agent -emdWalletSrcUrl "http://oramon.isd.org:4890/em"

On the new server log in to emcli

$ emcli login -username=sysman
Error: Already logged in as user "sysman". Use "emcli logout" to logout the current user.
$ emcli sync
Synchronized successfully
$ emctl config emrep -agent <new server>:3872


Oracle Enterprise Manager Cloud Control 12c Release 2
Copyright (c) 1996, 2012 Oracle Corporation. All rights reserved.
Please enter repository password:
Enter password :
Login successful
Moved all targets from oramon.lrk.org:3872 to oramon.isd.org:3872
Command completed successfully!
Enter password :
Login successful
Moved all targets from oramon.lrk.org:3872 to oramon.isd.org:3872
Command completed successfully!


Move all WebLogic targets to the new management agent

Login to the OEM GUI running on the new server and navigate to the WebLogic Domain target for the Cloud Control domain. In the Target Setup -> Monitoring Credentials section, update the Administration server host value to the new server name, then hit OK. Then execute a Refresh WebLogic Domain, selecting Add/Update Targets, to move all WebLogic targets to the new central agent.

  WeblogicTargets

Move all WebLogic agent targets to the new management agent

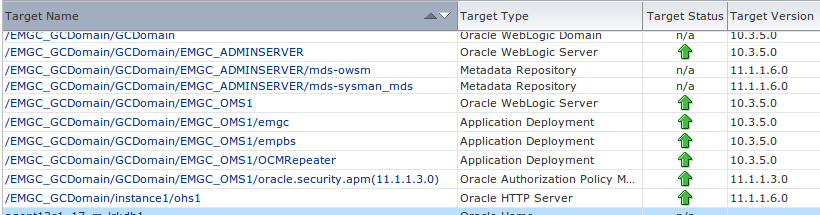
We noticed that after the previous step still some targets where listed on the old OMS agent. On the old OMS:

$ emctl config agent listtargets
Oracle Enterprise Manager Cloud Control 12c Release 2
Copyright (c) 1996, 2012 Oracle Corporation. All rights reserved.
[<old server>, host]
[<old server>:3872, oracle_emd]
[oms12c1_3_oramon, oracle_home]
[EMGC_GCDomain, oracle_ias_farm]
[WebLogicServer10_3_5_0_oramon_9552, oracle_home]
[webtier12c1_22_oramon, oracle_home]
[agent12c1_9_oramon, oracle_home]
[OraDb11g_home1_1_oramon, oracle_home]
[OraDB12Home1_29_oramon, oracle_home]
[/EMGC_GCDomain/GCDomain/EMGC_OMS1/OCMRepeater, j2ee_application]
[/EMGC_GCDomain/GCDomain/EMGC_OMS1/emgc, j2ee_application]
[/EMGC_GCDomain/GCDomain/EMGC_OMS1/empbs, j2ee_application]
[/EMGC_GCDomain/GCDomain/EMGC_ADMINSERVER/mds-owsm, metadata_repository]
[/EMGC_GCDomain/GCDomain/EMGC_ADMINSERVER/mds-sysman_mds, metadata_repository]
[/EMGC_GCDomain/instance1/ohs1, oracle_apache]
[/EMGC_GCDomain/GCDomain/EMGC_OMS1/oracle.security.apm(11.1.1.3.0), oracle_apm]
[/EMGC_GCDomain/GCDomain, weblogic_domain]
[/EMGC_GCDomain/GCDomain/EMGC_ADMINSERVER, weblogic_j2eeserver]
[/EMGC_GCDomain/GCDomain/EMGC_OMS1, weblogic_j2eeserver]


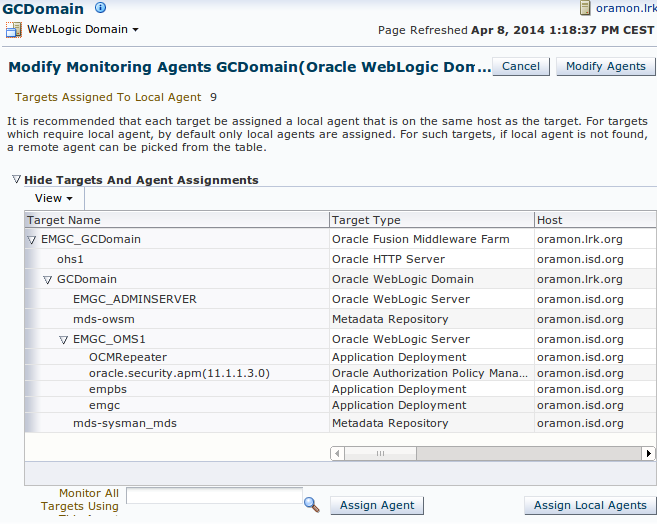
To fix this we opened the GCDOMAIN (Weblogic Domain) target [/EMGC_GCDomain/GCDomain/]

– [Weblogic Domain] – [Target Setup] – [Modify Agents] – [Continue]
– [Monitor All Targets Using This Agent] – [Select correct agent host] – [Modify Agents]

ModifyingWeblogic

Move remaining Weblogic targets

Some weblogic targets still remained on the old agent running on the old OMS server:

$ emctl config agent listtargets

Oracle Enterprise Manager Cloud Control 12c Release 2
Copyright (c) 1996, 2012 Oracle Corporation. All rights reserved.
[<old server>, host]
[<old server>:3872, oracle_emd]
[WebLogicServer10_3_5_0_oramon_9552, oracle_home]
[webtier12c1_22_oramon, oracle_home]

We will relocate them manually with emcli relocate_targets on the new OMS server:

$ emcli relocate_targets \
-src_agent=<old server>:3872 \
-dest_agent=<new server>:3872 \
-target_name=webtier12c1_22_oramon
-target_type=oracle_home \
-copy_from_src -force=yes


Moved all targets from <old server>:3872 to <new server>:3872

$ emcli relocate_targets \
-src_agent=<old server>:3872 \
-dest_agent=<new server>:3872 \
-target_name= WebLogicServer10_3_5_0_oramon_9552
-target_type=oracle_home \
-copy_from_src -force=yes

Moved all targets from <old server>:3872 to <new server>:3872

Now check on the old server if the are still any Weblogic targets left that should be present on the new server.

Update EM Console Service

I have only one target showing down at this point, the EM Console Service. Go to the target, and click on the Monitoring Configuration tab. Click on Service Tests and Beacons. Select the EM Console Service Test, and click the Edit button. Make sure you have the “Access Login page” step selected, and click Edit. Change the URL to reflect your new OEM server, and save the changes.

Update Management Services and Repository

Go to target Management Services and Repository

– [OMS and Repository] – [Target Setup] – [Monitoring Configuration] –
– Change [ Repository Connect Descriptor ]

(DESCRIPTION=(ADDRESS_LIST=(ADDRESS=(PROTOCOL=TCP)(HOST=oramon.lrk.org)
(PORT=1521)))(CONNECT_DATA=(SID=CCON1)))


to

(DESCRIPTION=(ADDRESS_LIST=(ADDRESS=(PROTOCOL=TCP)(HOST=oramon.isd.org)
(PORT=1521)))(CONNECT_DATA=(SID=CCON1)))

Fix targets in Status Pending

OEM12c has a great feature that allows you to resynch the agent via OEM. Here are the steps:

  • Go to Setup –> Manage Cloud Control –> Agents;

  • Click on the testdrv01 agent;

  • On the drop down menu from Agent, choose Resynchronization;

  • Be sure to select “Unblock agent on successful completion of agent resynchronization”.

The next step is probably unsupported and perhaps not necessary for your configuration, but it fixed our last issues!

Replaced <new server> to <old server> in :

/u01/app/agent12c/agent_inst/sysman/emd/targets.xml
/u01/app/mware/gc_inst/user_projects/domains/GCDomain/config/config.xml
/u01/app/mware/gc_inst/user_projects/domains/GCDomain/init-info/startscript.xml


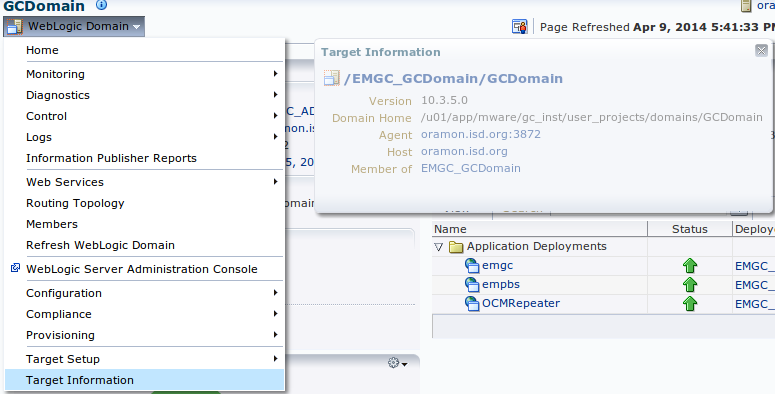
Update host for Weblogic Domain and IAS Farm

The next step is probably unsupported and perhaps not necessary for your configuration, but it fixed our last issues!

Targets Oracle Weblogic Domain and Oracle Fusion Middleware Farm still have the old host configured in [Target Information]. Not knowing how the fix this with the tools we decided to update the repository:

Connect as SYSMAN to the repository database:

update "sysman"."em_manageable_entities" set host_name = 'oramon.isd.org'
where entity_type = 'weblogic_domain'
and entity_name = '/EMGC_GCDomain/GCDomain';

update "sysman"."em_manageable_entities" set host_name = 'oramon.isd.org'
where entity_type = 'oracle_ias_farm'
and entity_name = 'EMGC_GCDomain';

After the update both Agent and Host refer to the new OMS server oramon.isd.org:

EMGCDomain


From this point our Enterprise Manager 12c installation is now completely configured and running on our new monitoring server.

Move EM 12c OMS and Repository to a new host (1/2)

Posted by Ronald on May 12, 2014  /   Posted in EM Cloud Control 12c

Introduction

As we did more Enterprise Manager (re)-installations in the past, this time we opted for a complete move of the repository database and OMS to a new server. In this way we’re able to keep all history and was it not necessary to do any new configuration on all monitored servers. Both repository database (11.2.0.3) and OMS are located on 1 dedicated server.

We found the following resources on the internet

How to migrate em12c r3 oms and repository to a new host: http://pardydba.wordpress.com/2013/08/28/how-to-migrate-em12c-r3-oms-and-repository-to-a-new-host/

and

Relocate targets with em 12c: https://blogs.oracle.com/EMMAA/entry/relocating_targets_with_em_12c

Both resources we’re helpful but we had to do some more configuration steps to get a 100% result to move our version of Enterprise Manager Cloud Control 12c ( 12.1.0.2.0 ) to a new server.


Move Repository

Our first step: move repository database from the old to the new server. On the source server, list the oms details:
[oracle@oramon:oracle]$ emctl config oms -list_repos_details
Oracle Enterprise Manager Cloud Control 12c Release 2
Copyright (c) 1996, 2012 Oracle Corporation. All rights reserved.
Repository Connect Descriptor : (DESCRIPTION=(ADDRESS_LIST=(ADDRESS=(PROTOCOL=TCP)
(HOST=oramon.lrk.org)(PORT=1521)))(CONNECT_DATA=(SID=CCON1)))

Repository User : SYSMAN
Next, stop OMS
emctl stop oms -all

and clone the database repository to the new server, after you installed the database software. Copying the database will be easier if you maintain the same database name and directory structure:
scp datafiles in /u02/oracle/CCON1/....
scp redolog and controlfiles in /u02/oracle/fra/CCON1/...
scp $ORACLE_HOME/dbs
scp $ORACLE_HOME/network/admin/[tnsnames | listener].ora

Now configure the old OMS with the new location of the database
emctl config oms -store_repos_details -repos_port <port> -repos_sid <repository SID> \
-repos_host <new server> -repos_user SYSMAN -repos_pwd <sysman_password>

If there are multiple OMSs in this environment, run this store_repos_details command on all of them.

And finally, restart all the OMSs using ’emctl stop oms -all’ and ’emctl start oms’.

Install new OMS software only

On the new server, install OMS Software only.

At the end of the installation this message appears:

Successfully installed the software binaries.
To configure the installation, run the following command from the Oracle home of the OMS:

/u01/app/mware/oms/sysman/install/ConfigureGC.sh

We did not run this command, because there is nothing to configure yet.

Install Plug-ins and patches

Now we need to know what patches and plug-ins were already installed on the old OMS.

Patches

Look for the installed patches on the old OMS server:
$ $OMS_HOME/OPatch/opatch lsinv

We came up with a list of 12 (interim) patches running release 2 of EM12c:


  • Patch 16236221 – 12.1.0.2.2 Patch Set Update for Oracle Management Service
  • Patch 16417886
  • Patch 15951627: 14322382 14557211 14633352 14647160 14732247 14848419 15836317 15880699 15951627

These patches can be installed according the patch installation notes.


Plug-ins

To identify all plug-ins to be installed on the new OMS run this query on the OMS database repository:
SELECT
epv.display_name
, epv.plugin_id
, epv.version
, epv.rev_version
, decode(su.aru_file, null,'Media/External' ,
'https://updates.oracle.com/Orion/Services/download/' ||
aru_file||'?aru='||aru_id||chr(38)||'patch_file='||aru_file) URL

FROM em_plugin_version epv
, em_current_deployed_plugin ecp
, em_su_entities su
WHERE epv.plugin_type NOT IN ('BUILT_IN_TARGET_TYPE', 'INSTALL_HOME')
AND ecp.dest_type='2'
AND epv.plugin_version_id = ecp.plugin_version_id
AND su.entity_id = epv.su_entity_id;


DISPLAY_NAME                   PLUGIN_ID          VERSION     URL
—————————— —————— ———– ————————————-

Oracle Virtualization          oracle.sysman.vt   12.1.0.3.0
Media/External

Oracle Exadata                 oracle.sysman.xa   12.1.0.3.0
Media/External

Oracle Fusion Middleware       oracle.sysman.emas 12.1.0.3.0
Media/External

Oracle MOS (My Oracle Support) oracle.sysman.mos  12.1.0.3.0
https://updates.oracle.com/Orion/Services/download/p15885895_112000_Generic.zip?aru=15689634&patch_file=p15885895_112000_Generic.zip

Oracle Database                oracle.sysman.db   12.1.0.3.0
https://updates.oracle.com/Orion/Services/download/p16282741_112000_Generic.zip?aru=15965857&patch_file=p16282741_112000_Generic.zip

Pythian MySQL Plugin           pythian.mysql.prod 12.1.0.1.2
Media/External


Download ALL these plugins and place them in a new folder on the new server. Rename downloaded plug-in *.zip files to *.par files.


Now Install the plugins

$OMS_HOME/sysman/install/PluginInstall.sh -pluginLocation \
/staging/oracle-sw/em12c_plugins

Prepare the software library

In our case the software library is on a shared location, so no need to copy or configure, everything stays the same.


Recreate the OMS with OMSCA

We are recreating/configuring the new OMS by importing the backup from the old OMS into the new OMS.

On the old OMS server, stop oms and agent and make a backup.

$ $OMS_HOME/bin/emctl stop oms -all
$ sleep 5
$ $AGENT_HOME/bin/emctl stop agent

Backup the OMS configuration

[oramon.lrk.org:]$ emctl exportconfig oms -sysman_pwd <sysman_password> -dir /tmp
[oramon.lrk.org:]$ scp opf_ADMIN_20140407_092736.bka <new server>:/tmp

Restore the OMS configuration on the new server
[<new server>:]$ cd /tmp
[<new server>:]$ omsca recover -as -ms -backup_file opf_ADMIN_20140407_092736.bka
Oracle Enterprise Manager Cloud Control 12c Release 12.1.0.2.0
Copyright (c) 1996, 2012, Oracle. All rights reserved.

OS check passed.
OMS version check passed.
Performing Admin Server Recovery…
Retrieved Admin Server template.
Populated install params from backup…
Enter Admin Server user password: <weblogic_password>
Confirm Password: <weblogic_password>
Enter Node Manager Password:
Confirm Password:
Enter Repository database user password:
Enter Agent Registration password:
Confirm Password:
Doing pre requisite checks ……
Pre requisite checks completed successfully

Checking Plugin software bits
Proceed to recovery
Setting up domain from template…
Setup EM infrastructure succeeded!
Admin Server recovered from backup.
Now performing cleanup of OMS EMGC_OMS1…
Now launching DeleteOMS…
OMS Deleted successfully

Delete finished successfully
Now launching AddOMS…
Infrastructure setup of EM completed successfully.

Doing pre deployment operations ……
Pre deployment of EM completed successfully.

Deploying EM ……
Deployment of EM completed successfully.

Configuring webtier ……
Configuring webTier completed successfully.

Importing OMS configuration from recovery file…

If you have software library configured
please make sure it is functional and accessible
from this OMS by visiting:
Setup->Provisioning and Patching->Software Library

Securing OMS ……
Adapter already exists: emgc_USER
Adapter already exists: emgc_GROUP
Post “Deploy and Repos Setup” operations completed successfully.

Performing Post deploy operations ….
Total 0 errors, 77 warnings. 0 entities imported.
pluginID:oracle.sysman.core
Done with csg import
pluginID:oracle.sysman.core
Done with csg import
OMSCA-WRN:Few post deploy operation failed. Check the file:/u01/app/mware/oms/cfgtoollogs/omsca/logs20140407101414/omsca_err.txt
Post deploy operations completed successfully.

EM configuration completed successfully.
EM URL is:https://oramon.isd.org:7802/em

Add OMS finished successfully
Recovery of server EMGC_OMS1 completed successfully
OMSCA Recover completed successfully

No errors in the omsca_err.txt, all seems fine.

Now start the OMS on the new server:
$OMS_HOME/bin/emctl start oms

Oracle Enterprise Manager Cloud Control 12c Release 2
Copyright (c) 1996, 2012 Oracle Corporation. All rights reserved.
Starting Oracle Management Server...
Starting WebTier...
WebTier Successfully Started
Oracle Management Server Successfully Started
Oracle Management Server is Up

The last part of the configuration is about relocating agent targets, including the central management agent, which will be explained in part 2.


Move OCR, voting disks and spfile

Posted by Ronald Hijdra on May 22, 2013  /   Posted in Oracle RAC

Some time ago we needed new storage for our 2-node RAC cluster because of disk warnings on our NFS storage server. We use this cluster for performance load and stress testing only so there is no production involved. Rebuilding the cluster was an option but we preferred not to do so since Oracle has many features to maintain the RAC environment.

Plan is to move everything from DATA_OCR to new data group DATA_OCR_VD.

Check the current situation (root)

cat /etc/oracle/ocr.loc

ocrconfig_loc=+DATA_OCR
local_only=FALSE

At the end of this process ocrconfig_loc will be changed to the new DATA_OCR_2 data group.

# crsctl query css votedisk

## STATE File Universal Id File Name Disk group
-- ----- ----------------- --------- ---------
1. ONLINE 76af9477a1e94f6bbfb1f6642f4ce544 (/u02/nfsdg/disk1) [DATA_OCR]
2. ONLINE a43e34a502754fdfbfc52bcd37b04588 (/u02/nfsdg/disk2) [DATA_OCR]
3. ONLINE 0690e8aa22164f17bfda3f3d2eb7db92 (/u02/nfsdg/disk3) [DATA_OCR]

ASM is using 3 voting disks for NORMAL REDUNDANCY.

In ASMCMD

set lines 300
select MOUNT_STATUS , NAME, PATH from v$asm_disk ;

MOUNT
STATUS NAME          PATH
-------------------------------------
CACHED DATA_KTB_0000 /u02/nfsdg/disk6
CACHED DATA_GIR_0000 /u02/nfsdg/disk5
CACHED DATA_OCR_0002 /u02/nfsdg/disk3
CACHED DATA_OCR_0000 /u02/nfsdg/disk1
CACHED DATA_LRK_0000 /u02/nfsdg/disk4
CACHED DATA_OCR_0001 /u02/nfsdg/disk2
CACHED FRA_0000      /u03/nfsdg/disk7

7 rows selected.

Results for the ocrcheck command:

# ocrcheck
 Status of Oracle Cluster Registry is as follows :
 Version : 3
 Total space (kbytes) : 262120
 Used space (kbytes) : 3072
 Available space (kbytes) : 259048
 ID : 982593816
                      Device/File Name : +DATA_OCR
                      Device/File integrity check succeeded
                      Device/File not configured
                      Device/File not configured
                      Device/File not configured
                      Device/File not configured
 Cluster registry integrity check succeeded
 Logical corruption check bypassed due to non-privileged user</p>

The OCR looks ‘healthy’.

Make OCR backup

Check if you have OCR backups available:

# ocrconfig -showbackup</code>

m-lrkdb2 06/22 12:20:50 .../11.2.0/grid_2/cdata/m-lrkdbacc/backup00.ocr
m-lrkdb2 06/22 08:20:50 .../app/11.2.0/grid_2/cdata/m-lrkdbacc/backup01.ocr
m-lrkdb2 06/22 04:20:49 .../app/11.2.0/grid_2/cdata/m-lrkdbacc/backup02.ocr
m-lrkdb2 06/20 16:20:46 .../app/11.2.0/grid_2/cdata/m-lrkdbacc/day.ocr
m-lrkdb1 06/09 02:16:17 .../app/11.2.0/grid_2/cdata/m-lrkdbacc/week.ocr

PROT-25: Manual backups for the Oracle Cluster Registry are not available

Backup files are approximately 7Mb each.

You can make another manual backup(root):

# ocrconfig -manualbackup

If you need it, the command for restore of the OCR:

# ocrconfig -import[text]

Add new OCR disk group

Create a new disk group for the OCR using ASMCA
ASMCA - Create Disk Group

SQL> select failgroup, name from v$asm_disk; 

FAILGROUP                 NAME 
------------------------- ------------------------------ 
FRA_0000                  FRA_0000 
DATA_OCR_0000             DATA_OCR_0000   <-- old
DATA_OCR_0001             DATA_OCR_0001   <-- old 
DATA_OCR_0002             DATA_OCR_0002    <-- old
...
...
DATA_OCR_VD_0000          DATA_OCR_VD_0000    <-- new
DATA_OCR_VD_0001          DATA_OCR_VD_0001    <-- new 
DATA_OCR_VD_0002          DATA_OCR_VD_0002    <-- new

Now we have a new disk group and we can start moving

  • spfile(s)
  • voting disks
  • OCR

All three items will be moved to disk group DATA_OCR_VD.

Move spfile

In our configuration the spfile is located in the OCR and it should also move to the new disk group for the OCR:

In +ASM instance (user grid):

create pfile from spfile;
create spfile=’+DATA_OCR_VD’ from pfile;

After this step the value for parameter spfile is still set to the old location, so if you want to be sure the change is applied correct you can do a cluster node restart:

On node 1:

# crsctl stop cluster
# crsctl start cluster

In the ASM instance, as user grid:
SQL> show parameter spfile
NAME TYPE VALUE
———————————— ———–
spfile string +DATA_OCR_2/m-lrkdbacc/asmpara
meterfile/registry.253.7545848
21

Spfile is pointing to the new location on node 1.

node 2:
# crsctl stop cluster
# crsctl start cluster

SQL> show parameter sp


Applying monitoring templates in EM 12c failed

Posted by Ronald Hijdra on May 21, 2013  /   Posted in EM Cloud Control 12c

To get rid of the many TNS-01190 errors I received from the listeners on each database node we successful applied a (default) custom listener template. But for some reason newly created databases didn’t get the default listener template applied and we started receiving TNS-01190 errors again.

I tried several times to apply the custom listener template, both Template will completely replace all metric settings in the target and Template will only override metrics that are common to both template and target options to all new databases and submitted the job but the action always ended with status ‘Failed’ for all databases.

Digging deeper led to the following error message which only showed up in the Incident Manager:

Incident (EM-2902 [EMOMS][core.templ.uimodel.applicationModule.ApplyTempla) detected in
gc_inst/user_projects/domains/GCDomain/servers/EMGC_OMS1/adr/diag/ofm/
EMGC_DOMAIN/EMOMS/alert/log.xml at time/line number: Tue May 7 11:40:35 2013/542.

The problem started after we upgraded the EM 12c Database plug-in from 12.1.0.2.0 to 12.1.0.3.0.

My Oracle Support came up with Note.539175.1 which best fitted our problem description: Bug 16417886 : METRIC TEMPLATE ERRORS WITH 12.1.0.3 DB PLUGIN.

The solution was to apply patch 16417886 to the OMS ORACLE_HOME. So I did following the readme after applying pre-required patch PSU 12.1.0.2.2 (16236221).

But although the template apply jobs ended with “Completed”, the template wasn’t applied correct. The TNS-01190 error we tried to suppress in our custom template still wasn’t ignored. A check on the listener metrics itself confirmed that nothing had changed.

This last issue was resolved by creating and applying a complete new listener template.

^ Back to Top